As a gun owner, it is your responsibility to master the efficient and safe use of your firearm—all the fundamentals that culminate with the pressing of the trigger to send a bullet downrange. But have you ever wondered what is actually happening to that bullet after it leaves the barrel?
Knowing your specific firearm’s actual ballistic performance with a specific cartridge has many benefits. Will the bullets in your self-defense ammunition expand reliably at the velocities produced by your short-barreled concealed carry pistol? Are the cartridges that you are using in conjunction with a suppressor actually subsonic? Do you have accurate velocity data to plug into your ballistic app to be able to make that long-range shot? How much energy is your pet muzzleloader recipe producing? The way to answer these questions is to use a chronograph.
A ballistic chronograph is an instrument used to measure the velocity of a projectile while it is in flight. The basic data that a chronograph provides is how fast a projectile is traveling with a time/distance ratio, like feet/seconds. Once you have this data, many other facts about your ballistics can be extrapolated. Use the weight of your projectile in conjunction with its speed to calculate its energy or competition “Power Factor.” Once you have multiple velocity data points, you can calculate statistics like average, standard deviation and extreme spread to determine the consistency of your ammunition, which generally correlates to how accurate it will be. A good chronograph will do all these calculations for you.
Modern ammunition manufacturing is a high-tech science, with cartridge and bullet performance tailored to very specific purposes. The ballistics on the side of a box or on a web page reflect that cartridge being fired through a very specific barrel length and type of firearm. A .357 Magnum cartridge designed to hunt deer with an 8”-barreled revolver is not the best choice for your 1 7/8”-barreled concealed-carry revolver and your “compact revolver” self-defense ammunition is not the best choice for hunting. Continuing to use the .357 Mag. as an example, there is a 1,200 feet per second (f.p.s.) difference in the velocity of the same cartridge loaded with a 125-grain bullet when it’s fired from an 18” rifle barrel versus a 2” handgun barrel.
There are three different types of ballistic chronographs: optical, magnetic and Doppler radar. Each design has its advantages and disadvantages when it comes to set-up, ease of use and what type of projectiles it can measure.
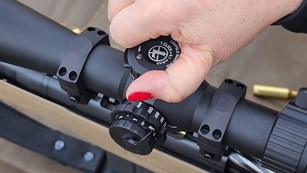
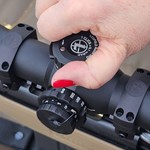
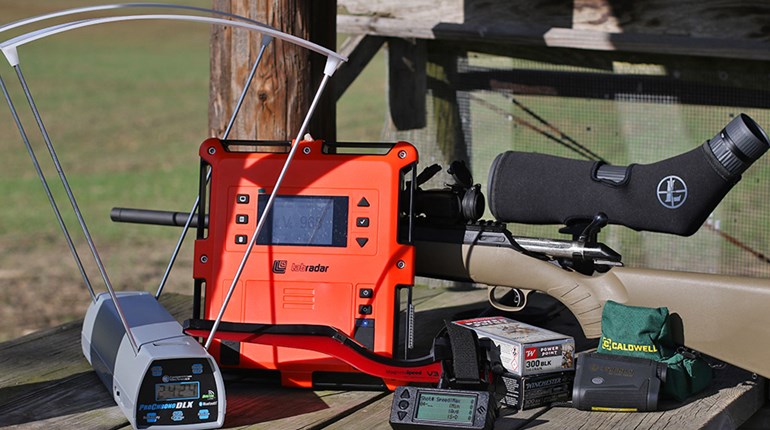
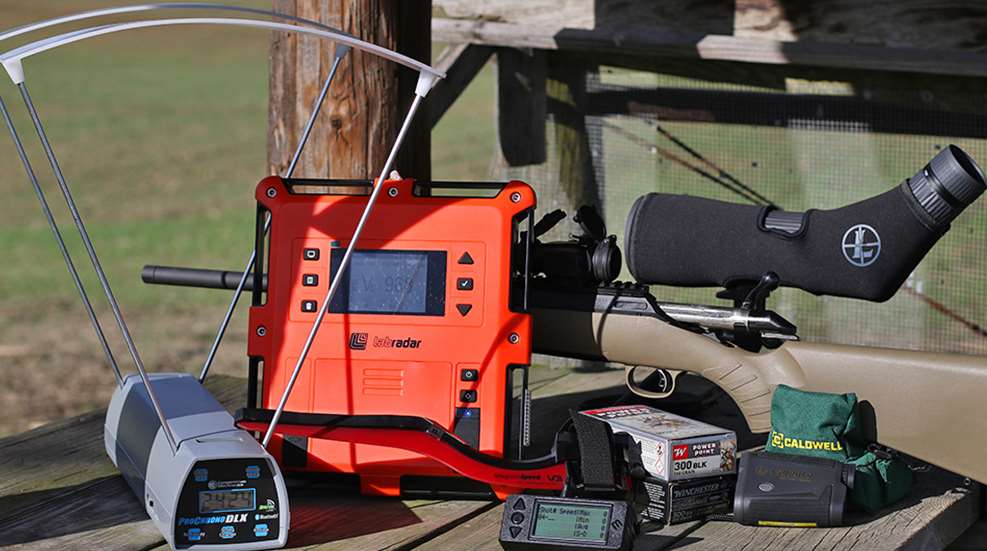
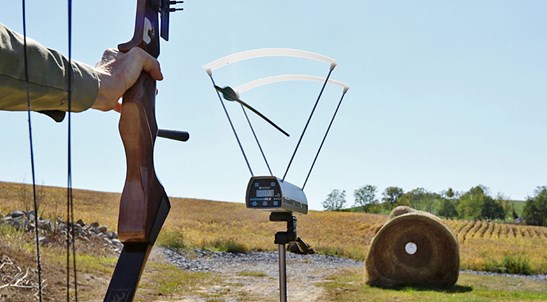
Shown here is the Competition Electronics ProChrono DLX optical chronograph with sky shields installed.
Optical
Just as the name implies, these types of chronographs have optical sensors that “see” a projectile pass over at least two points. The chronograph records the time it took for the projectile to move between these points and instantly calculates and displays its speed. Optical chronographs can measure rifle and handgun bullets, solid or multiple projectile shotgun loads, arrows and crossbow bolts, paintballs, BBs … as the manual for the Competition Electronics ProChrono DLX unit we tested states, “If you can get it to pass over the sensors, you can probably measure the velocity.” Sometimes I shoot a rubber band over the sensors after I get an optical chronograph set up to ensure the lighting conditions are adequate to measure velocities prior to shooting.
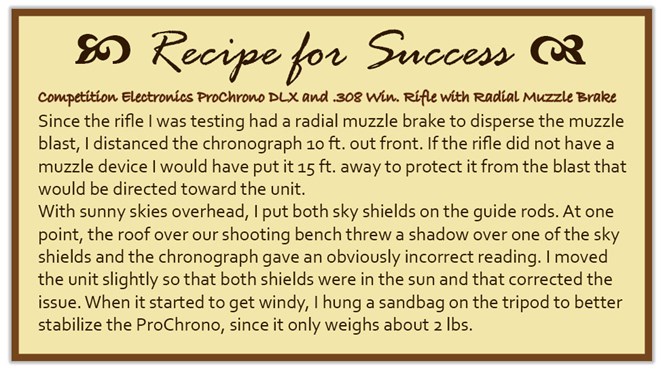
All optical chronographs require that the unit is placed in front of the device launching the projectile. For handguns and shotguns the chronograph is placed about five feet away, while rifles need to be 10 to 15 feet away to protect the unit from the muzzle blast. For this reason, optical chronographs are not measuring actual muzzle velocity, but you can use the data they provide to calculate what the velocity would be at the muzzle. NRA Publications’ firearms reviews list the distance the chronograph was placed from the muzzle in the fine print below the shooting test results, if an optical chronograph was used.
The initial set-up is the tedious part of using an optical chronograph. As you are positioning the chronograph in front of the firing line, maintain all your safety rules. This also makes an optical chronograph difficult to use when other shooters are present, such as at a public outdoor range, as you must wait for a cease-fire to walk in front of the firing line.
Most optical chronographs use vertically extending guide rods that will help you in achieving proper alignment with the unit. The projectile needs to pass parallel over the sensors for an accurate reading. You want to be sure that the barrel is centered within the triangle those guide rods form with the unit. Take care when using a magnified or electronic optic, as the firearm’s bore line is below the sight picture you see in the optic. Err on the side of being closer to the guide rods and shields. Manufacturers sell these individual parts if they get damaged.
Since optical units need to “see” the projectile, the lighting conditions are crucial to the operation of this type of chronograph. They need a clear view of the space above the sensors and ample light, so no overhanging trees or roofs. The ideal outdoor conditions are an overcast day when clouds are diffusing the sun. On sunny days, you will need to install the provided diffuser shields. These attach to the top of the guide rods and give the optical sensors an even light-colored backdrop to detect the projectile. For indoor use, most optical chronographs have optional light bars that are fitted to the top of the guide rods and provide optimal light for the unit to accurately record velocities.
Optical chronographs will measure the velocity of almost any object that passes over the sensors.
Even with ideal lighting conditions, sometimes optical chronographs just have trouble seeing really small projectiles (i.e. BBs or pellets) or they can be thrown off by the reflections of metallic-jacketed bullets when shooting on sunny days. The user manual will usually go over suggestions of how to achieve accurate velocities for these types of projectiles.
I’ve spent the past decade using Competition Electronics’ now-discontinued ProChrono Digital. For this test, I procured the company’s latest DLX model. It is a nice update that gives you the option to control and monitor the chronograph via a Bluetooth connection on your phone, tablet or computer using the free app. A green light indicates that the unit is paired with your device. You don’t have to use a separate device, as data is stored and recorded internally on the unit as well and you can use the on-board buttons to review it on the unit’s screen. You can shoot nine different strings with up to 99 shots within each string. The data can then be exported to a spreadsheet document. The unit will record velocities from 20 to 9,999 f.p.s. The ProChrono is powered by a 9-volt battery that lasts for approximately 20 hours of operation. Accuracy is +/-.5 percent of measured velocity or better. The Competition Electronics ProChrono DLX unit retails for $164.95.
Pros:
- Easy to operate once properly setup
- Able to measure a wide variety of types of projectiles without additional accessories needed
- The most affordable type of chronograph, most optical chronographs range between $130 and $200 (though some cost up to $600)
Cons
- Must be mounted to a tripod (sold separately)
- Takes a little more time for initial setup – measuring distance, leveling tripod, bore alignment
- Doesn’t measure velocity at muzzle
- Subject to weather and lighting conditions
- Shooting across the unit, care must be taken to not hit the chrono
- Adjustments to unit must be made downrange
The MagnetoSpeed chronograph attaches to the firearm to measure muzzle velocity.
Magnetic
Consumer-level chronograph technology is branching out beyond optical sensors. One example is a design that attaches to the barrel of the firearm and utilizes two electromagnetic sensors to measure velocities. Known as the MagnetoSpeed, this ballistic chronograph provides velocity readings via a bayonet-style sensor unit. Each sensor produces “a voltage that is proportional to the change in its magnetic field” to detect the bullet passing over it. The chronograph then calculates the velocity based on the distance between the calibrated sensors to +/-.005 of an inch.
The MagnetoSpeed uses a Velcro strap and various provided spacers to attach to the barrel of rifles or long-barreled revolvers. The top of the sensor deck needs to be aligned 1/4” below the bore of the barrel. It can be used with rifles that have muzzle brakes and, in fact, it has a “blast beam” section on the sensor to withstand the force of any escaping gases being directed downward. After tightening down the strap, you connect the display unit to view the velocities as you shoot. Be sure to check the strap every few shots to re-tighten the unit, if necessary.

The V3 model comes with a 1/4” alignment rod to checking the spacing between the bore and the unit.
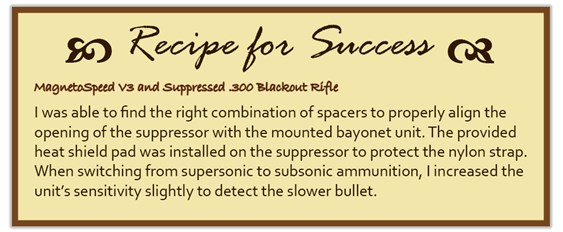
The MagnetoSpeed comes in two models, the Sporter and the V3. The base-level Sporter model only records center-fire rifles and revolvers and doesn’t accommodate suppressors, barrels over one inch in diameter, or muzzle devices more than 2.7” long, but is priced at $249. The V3 kit that we tested retails for $449 and includes additional mounting spacers, an alignment rod and a more advanced display. It will accommodate muzzle devices up to 3.5” in length and barrels and suppressors up to 2” in diameter. The V3 model has sensitivity settings to be able to detect airgun, rimfire and muzzleloader bullets and both solid and multi-projectile shotgun loads.
The V3 model will work with some pistols and short-barreled rifles. There is a Picatinny rail adapter offered as an accessory that the bayonet unit will mount to, but you need to check the company’s website to see if your pistol is compatible with its dimensional restrictions. If you use a suppressor on your pistol, you can mount the V3 unit to the suppressor without any pistol adapters needed. It also has a mode to record shotgun loads with some adjustment as to how the bayonet unit is mounted to protect it from being damaged by the wadding.
An advantage of the MagnetoSpeed chronograph is that it stays attached to the firearm and you can change shooting positions or shooting lanes without having to realign it. One concern some shooters have with this type of chronograph is, does having the unit strapped to the barrel affect accuracy? The bayonet unit with several spacers weighs about 8 ozs. The consensus is that accuracy usually isn’t affected, but it can change point-of-impact, just like a suppressor or any other device that you attach to your firearm’s barrel. For those wanting to measure both velocity and accuracy you can do those tests separately. There are also off-barrel mount adapters for the V3 that can attach the unit to a rod that mounts to your rifle’s chassis or to a Picatinny rail on a handguard.
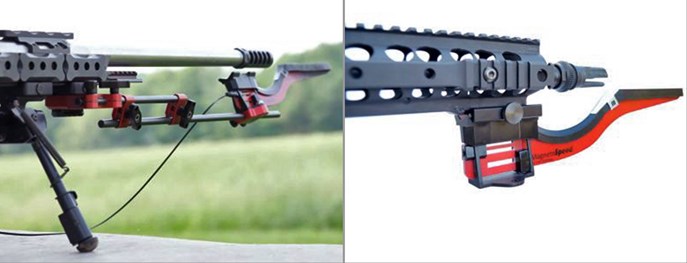
The Picatinny rail adapter and Gray Ops CNC off-barrel mount allow you to use the V3 bayonet unit without affecting barrel harmonics. Image courtesy MagnetoSpeed.

The MagnetoSpeed can be strapped onto revolvers with long barrels to measure velocity.
Both Sporter and V3 models have a display unit that plugs into the sensor that has a cord that allows it to be placed within the shooters line-of-sight. The V3 model comes with a micro SD memory card to archive the data and export it to a computer as a spreadsheet. You can also access different settings within the display unit. The manual goes over the suggested sensitivity levels for different types of bullets. It can record 99 shots per string. It will measure velocities from 300 to 7,000 f.p.s. According to MagnetoSpeed, the accuracy of their chronograph is 99.5% to 99.9%. The display uses a supplied 9-volt, giving you about 20 hours of use, or the V3 can be powered by two CR123 batteries providing over 50 hours of operation.
Pros
- Small, portable, relatively quick setup, easy to use
- Not subject to weather/lighting conditions
- Measures actual muzzle velocity with no minimum target distance
- Good unit to use at a public range—keeps you behind the firing line
Cons
- Mounting to barrel can shift point of impact
- Only detects metallic bullets—won’t chrono paintballs, plastic pellets, arrows
- Shooting across the unit, improper alignment can damage chrono
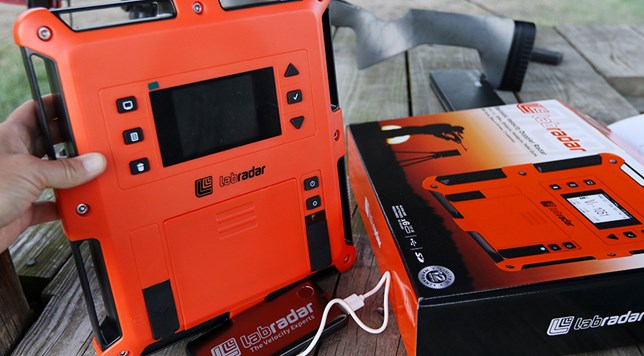
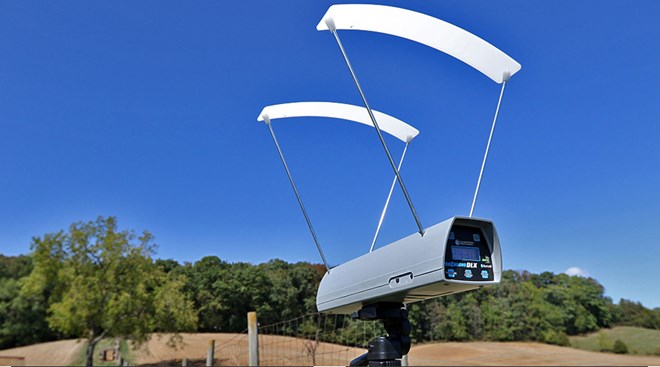
LabRadar makes a Doppler radar ballistic chronograph that can be set up beside the shooter on the bench.
Doppler Radar
At the other end of the ballistic chronograph world are Doppler radar units. This type of chronograph sends out continuous microwaves towards the target. When a shot is detected and a projectile passes across the beams at various distances the velocities are calculated. The LabRadar chronograph we tested will display five velocity readings at varying distances of your choosing up to 100 yards, depending on the projectile size.
The manual goes into detail about the ideal type of range you should have to get the best results from your LabRadar. This includes a good flat range, free of obstacles like trees or buildings for about 15 feet on either side of your target downrange. Because the radar beams are traveling all the way to your target you need to have that space clear to get a reading. The target needs to be placed at least 15 yards from the LabRadar for the unit to detect the projectile downrange.
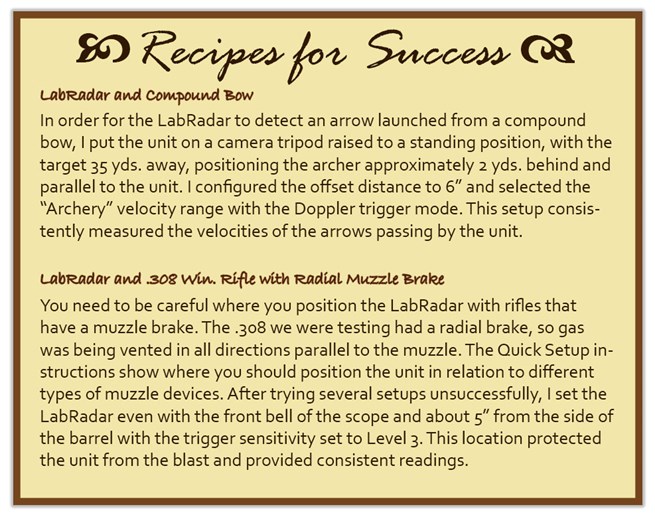
After powering up the unit, you go into the menu to configure your settings. You need to specify what velocity range you will be shooting—rifle, handgun or archery. Next you select what the offset of the unit will be to the muzzle. This is where you will be positioning the chronograph and it needs to stay at that distance to ensure accurate velocity readings. You have offset choices of 6”, 12” or 18”, so depending on what firearm you are shooting you might find that the unit needs to be closer, or farther, to detect the shots.
Doppler radar chronographs are triggered to start detecting by the sound of the shot being fired or by the movement of slower projectiles through the beams. The LabRadar allows you to choose “Trigger” or “Doppler” mode. The “Trigger” mode, which is what you would select for a firearm, utilizes the internal microphone of the unit. The Doppler setting is used for large, slow traveling projectiles, such as an arrow, that use the signal returned from the projectile to trigger the unit. The LabRadar may have problems detecting the sound of a suppressed shot and rimfire firearms or airguns. There is an accessory you can purchase which is essentially a small external microphone that plugs into the unit to amplify the sound. At a range where there are multiple people shooting at the same time, the LabRadar shouldn’t be triggered by other gunfire because you can adjust the sensitivity level to only detect the sound of the shot closest to the unit. If multiple LabRadar chronographs are being used in close proximity, you can set them to different frequency channels so as they don’t interfere with each other.
After you have configured the LabRadar and it is mounted and positioned at the appropriate distance from the muzzle (the manual gives descriptions and photos of positions that work best) you need to be sure it is aligned with the target downrange. Activating the “Armed” mode means the unit is ready to start measuring a projectile’s velocity.

You can measure pistol velocities by shooting next to the LabRadar with the muzzle even with the unit.
The LabRadar can be controlled with a phone app via Bluetooth. This can be convenient when you are ready to arm and disarm the unit, change to a new series, review velocities, etc. so that you don’t have to touch the unit which might misalign it.
There are several other accessories you may need to purchase separately to be able to use your LabRadar effectively. The unit can be run by six AA batteries, but it is recommended that you purchase the rechargeable battery pack that provides an auxiliary power supply. Also, the radar unit weighs almost 4 lbs. and needs to be mounted to a sturdy tripod or base to remain stable. Depending on your bench setup or range, this may need to be a mini tabletop tripod or a regular camera tripod. While the unit has some memory storage for basic data you will need to purchase an SD card to get the advanced reports. With an SD card inserted you can record up to 9,999 series of 100 shots. The LabRadar will detect velocities from 65 to 3,900 f.p.s. The LabRadar retails for $625. For the battery bank, SD card, and tripod expect to spend another $100.
Pros
- Measures actual muzzle velocities, as well as velocities at multiple distances downrange
- Positioned behind the muzzle, next to the shooter—range friendly behind the firing line
- Not subject to weather/lighting conditions
Cons
- Need to purchase several accessories to use unit effectively
- Learning curve to operate and tailor to specific firearms
- May need other adapters for detecting .22 LR, suppressors and airguns
- Can be finicky with indoor/narrow range setups
- Most expensive type of chronograph (units range between $600 and $1000)

Using the Doppler trigger mode you can record the velocities of arrows and other slow-moving projectiles.
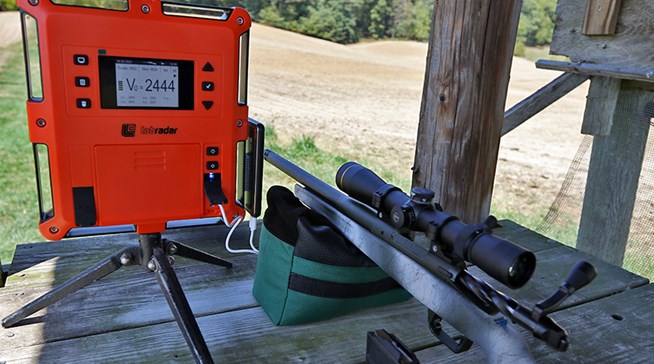
To protect the LabRadar unit from the blast of a muzzle device it needs to be positioned farther back from the muzzle.
How Did Each Model Perform?
Ease and speed to set-up and use
MagnetoSpeed: Once you get it strapped on the barrel it is easy to use, the display screen is pretty straightforward and you can move around to different targets without having to re-setup the chronograph. It only takes a few minutes to have it mounted and up and running.
ProChrono: While the time it takes to align the unit might not be the quickest, it is definitely easy to use once set up. You can control it manually with the onboard buttons or with your phone to switch strings, delete shots, etc.
LabRadar: This unit can sit right next to you at your bench, which makes it easy to access (a helpful feature as its many settings require attention). It may take some experimentation to find what configuration and settings work with your set-up. You must keep an eye out that the unit doesn’t turn off if you take too much time between shots.
Battery Life
ProChrono/MagnetoSpeed: Each were powered by a 9-volt and lasted through multiple hours-long range sessions in warm weather.
LabRadar: After using the unit for about an hour with a set of rechargeable AA batteries, the battery level was down to about 50%. In other sessions, using the battery bank to power the unit, after about three hours the power level was still at 84%. Purchasing the battery bank accessory would be advantageous for longer range sessions.
Most Consistent Lack of Errors
MagnetoSpeed: This unit was the most reliably consistent with tracking velocities.
LabRadar: It took a bit of a learning curve to understand what settings to use and how to position the unit to get it to reliably measure velocities. When switching between different firearms, I did some online research to see what set-up others had success with. Once finding the “sweet spot” for a particular firearm, it was very accurate and detected almost every shot. I keep a notebook to record my “Recipes for Success” to make subsequent testing sessions speedier.
ProChrono: The optical chrono gave a velocity for every shot, however, you needed to keep an eye on the accuracy of the readings when lighting conditions can cause inacurate velocities. It was able to measure the velocity of paintballs, arrows, rimfire bullets … and rubber bands … without any issues in detection.
The muzzle velocity readings from the MagnetoSpeed and LabRadar were within 2 to 3 f.p.s. of each other. ProChrono velocities were slightly slower, due to it being placed 5 to 15 feet in front of the muzzle.
Conclusion
So, which chronograph is right for you? That will depend on your budget, your range setup and the type of projectiles whose velocities you want measure. If you’re more of a handgun shooter, then an optical or Doppler radar chrono might be your best option. If you shoot at an indoor range where you can’t go in front of the firing line, then a MagnetoSpeed V3 with Picatinny rail adapter might be the one for you. Or if you want to be able to shoot in any weather or lighting conditions and see velocities at various distances downrange, a LabRadar would meet those needs. Pick a chronograph that fits your needs and it will provide you with the data that will help you better understand what’s happening after that bullet leaves your muzzle.
More Chronograph Tips and Tricks
- I find that it’s helpful to have a general idea of what velocity a cartridge should produce from your specific barrel length, as sometimes chronographs will give erroneously high or low readings. Try to lookup a test of your ammunition from a firearm with a similar barrel length to establish approximately how fast it should be.
- Search online forums for suggestions on set-ups that have worked for others to figure out how to best configure your chronograph for your specific setup.
- On sunny days I sometimes use DIY side sunshades made from thin cardboard from a cracker or cereal box taped to the sides of guide rods on an optical chronograph to block the sun from reflecting off the projectile, which can produce inaccurate readings.
- With the MagnetoSpeed, remember to check the strap tightness. I found that after shooting about 10 rounds from a .308 Win. rifle the unit had begun to slip forward slightly. I re-positioned it, re-tightened it and continued shooting. The MagnetoSpeed’s strap stayed secure longer with softer recoiling rifles.
- The LabRadar has a small notch in the top of the unit that you use to align it with your target. I found that trying use it to align with a small target at 100 yards could be a bit tricky. An online suggestion was to cut a small section of a soda straw and tape it to the notch to give you more of a “peep sight” and this helped in aligning the unit with those distant targets.
- To get started, I used each manufacturer’s online video demonstrating the set-up process for their unit: