You’ve got a deer field-dressed (gutted), hung up by the legs and skinned. Now you’re staring at a carcass ready to be turned into meat. Where do you start?
It might seem intimidating, but the good news is there isn’t really a way you can screw this up too badly—as long as you keep cutting until all the meat is off the bones, it’ll be fine. That said, there are some things to know to help you make the most of the animal.
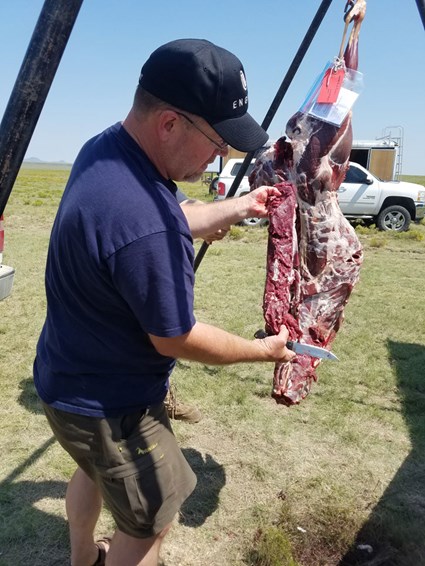
Getting It Off the Bone
There are many ways to do this, and this article is a very abbreviated overview of the process; you can find a more detailed process here. You’ll be cutting the meat off in chunks, some large, some small. Set up piles on a table or a couple of clean buckets to toss meat into, as well as a trash bucket or pile. Designate one bucket “good stuff I’m going to sort through later” and another bucket “grind.”
If you haven’t already done so during field-dressing, remove the inner tenderloins from inside the body cavity, running along the inside of the backbone. They will pull off easily with just a couple of cuts at the top and bottom. Now on to the front shoulders: Some hunters prefer to saw off the front legs entirely so they can debone them on a table, but either way, cut as much meat as you can off the front shoulders, in the largest pieces you’re able to remove off the bone. Big pieces go in the “good stuff” pile and small scraps go in the “grind” pile. Gristle and fat go in the trash—deer fat tastes awful and you do not want any of it on your meat or in your grind pile. Some silverskin is fine in the grind pile.
Remove as much meat from the neck, brisket and flank (belly and sides) as you are able. Then, cut out the backstraps, which are two long pieces of meat that run along the outside of the backbone on either side. You might have to cut off a layer of fat in order to get to the backstraps.
On to the hind legs. There are three or four large muscles here that make good roasts, and they naturally separate themselves with silverskin. Cut the roasts free and either trim the meat off the shanks (upper legs) or saw them into bone-in pieces to be used for osso bucco. Now go back and clean up what’s left—any bits of meat you can cut off the ribs or anywhere else. Discard the carcass and your trash pile.
Sorting Through It
At the butchering table, keep your “grind” bucket handy, because you’ll be adding to it as you sort through your “good stuff” bucket.
Think about what your family eats and how you want to package your venison. I like my meat to go into the freezer as meal-ready as possible, so when I thaw it and open it to cook, it’s ready to go. That means I trim all silverskin off as I’m butchering so it doesn’t need to be dealt with later. A filet knife is ideal for this task. We don’t eat a lot of deer roasts, but we love steaks, ground venison and stew meat, so that’s how I butcher.
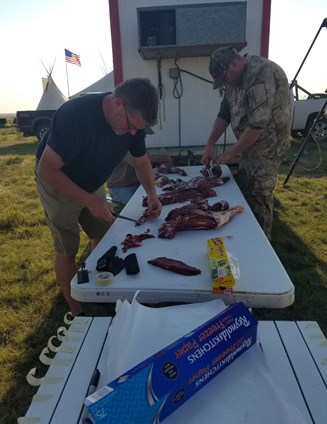
Cook the inner tenderloins that night if you can. It’s tradition, and they are wonderful fresh. Try them sliced across the grain into medallions, lightly floured and fried. Cut the backstraps into family-sized portions—for a family of four, cutting each backstrap in half will probably be about right, giving you four packages of backstrap. Either package the roasts as they are (silverskin trimmed) or slice them up for cubed steak, slice very thin for jerky, or chunk them up into stew meat, according to your preference.
Everything else will get the same treatment—if you can trim it into clean chunks, add it to the stew meat pile. If not, into the grind pile it goes.
Packaging It
You have two good options for packaging: vacuum sealing or a combo of plastic wrap and butcher paper. Both work well. With either route, package the meat in meal-sized portions and label it well with the animal, the cut, and the year.
Vacuum sealing is a simple process—just seal, label with a permanent marker and pile it in the freezer. If you are using plastic wrap, be generous with it. Wrap the meat tightly, wrapping the plastic around at least two or three times, pressing out as many air bubbles as you can. Then wrap it again in the opposite direction with a second piece of plastic wrap, which will help prevent blood from leaking out when it thaws in your fridge down the road. Wrap the package in butcher paper, tape it up with masking tape, label it and pop it in the freezer.
What to Do With the Grind Pile
Sort through the grind pile to remove any hair, fat or hunks of silverskin with little to no meat attached. An electric grinder is a nice piece of equipment to own, but if you’re not ready to make the investment, call your local deer processor or maybe even a small mom-and-pop butcher shop. Most processors will grind your deer for a small fee.
Consider whether you want fat added to your ground venison. Because it is so lean, venison with no fat added tends to make dry hamburgers, so many hunters choose to grind pork fat, beef tallow or even bacon trimmings into their meat. About 10 to 20 percent fat is a nice ratio. My preference is not to add fat to my venison. I grind it all at once and package in one-pound packs that are perfect for most uses. If I want to make hamburgers, I’ll thaw several pounds and run it back through the grinder with some fatty bacon, mixing it thoroughly. Then I cook what I need and repackage the rest to go back in the freezer, properly labeled. You don’t want to thaw and refreeze whole hunks of meat more than once, as the texture can be affected, but I’ve never had a problem thawing and refreezing ground meat.
Ground meat can be turned into breakfast sausage with the addition of some fat and seasonings. If you have the equipment and the inclination, you can also use ground venison to make summer sausage or link sausage, or ask your local processor to make it for you. If you go that route and it’s important to you that you get your own deer meat back, make sure the processor knows that so they do not combine yours with another hunter’s to make a bulk batch and split it.
All that’s left is to cook and enjoy. For best results and maximum flavor, keep your backstraps and steaks medium rare.
Most Popular